Hello Lovelies!
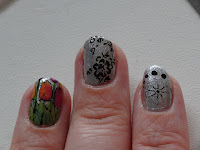
Today I want to show you a post I recently did using advanced stamping. As a base for this manicure I used Ruby Kisses - Silver Bling. On most of my nails I stamped on different black flower motives, but unfortunately most parts didn't transfer well. At first I wasn't sure if I should share this with you at all, but I like the accent nail so much I decided to go through with it.
To create a decal like the one below is actually quite easy. All you have to do is pick up your desired design on a stamper and let it dry for a minute. Then you can carefully fill it with colour and let it dry completely (approximately 30 mins.). If you already know how you want to place it and are sure you have good aim place it directly on your nail (dry to the touch but still a bit tacky!).
If you are like me and fear you won't get it straight, cover the whole stamper with a thin layer of clear polish and let that dry for an hour or so. Then carefully pull it off the stamper and you'll end up with a round decal. Place it on your nailand gently press down until it sticks. then use your nail or a cuticle pusher to trim off the excess.
Remove any remaining polish from the sides and the tip and seal it in with clear polish. It is a bit time consuming, especially if you want to do a full manicure with this technique, but I think it is worth the while and you can always do this on multiple stampers at once.
If you don't have a stamper you can try to do it tike this: nail decal.I hope you like my tulips! I know I love them! Have you already mastered the advanced stamping technique?
You may also like:


The decal you made is absolutely fantastic and super well done! Great nail art!
AntwortenLöschen